
Repair Visual Studio Without Losing Projects (2025, 2022 & 2019) | FreeLearning365
Introduction
If Visual Studio is crashing, freezing, failing to build projects, or certain features suddenly stop working, you don't need to uninstall it. Visual Studio's Repair feature is designed to fix damaged installation files without deleting your projects, solutions, or source code.
Many developers worry that repairing Visual Studio will erase their work. Fortunately, that's not how the Repair process works.
This guide explains the safest methods to repair Visual Studio 2025, 2022, and 2019 while keeping your development environment intact.
Solution 1: Use Visual Studio Installer Repair ⭐ Most Accurate Fix
The built-in Repair option reinstalls Visual Studio's core files while preserving your development work.
Steps
Close all running instances of Visual Studio.
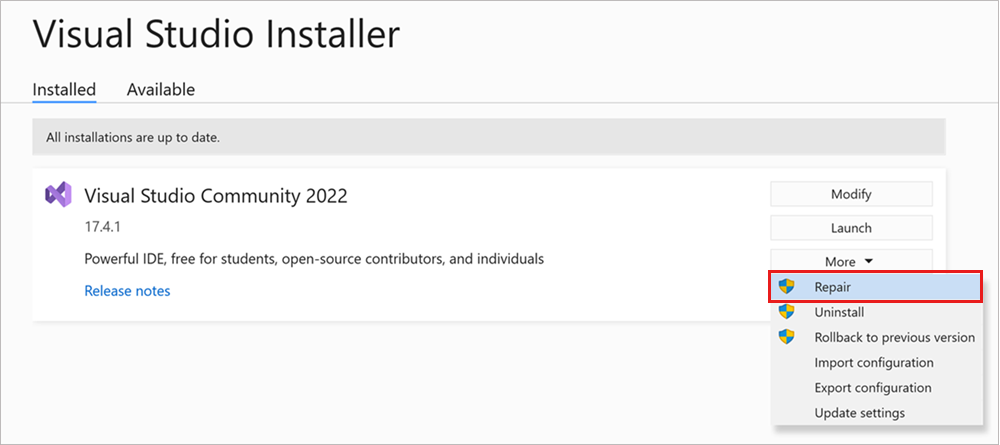
Open Visual Studio Installer.
Locate your installed Visual Studio edition.
Click:
More → Repair
Confirm the repair process.
Wait for the repair to complete.
Restart your computer if prompted.
What the Repair process keeps
The Repair operation does not remove:
Your projects and solution files
Source code
Git repositories
User settings
Installed extensions (in most cases)
Bookmarks
Window layouts
Breakpoints
NuGet packages inside your projects
What the Repair process fixes
It reinstalls and repairs:
Visual Studio core files
MSBuild components
IntelliSense engine
Debugger
C# compiler
SDK integrations
Package caches
IDE components
Why this works
Repair replaces corrupted or missing Visual Studio files while leaving your development environment and project data untouched.
Solution 2: Repair Only the Problem Workload ⭐ Most Efficient Fix
If only one feature is broken—for example Azure Development, Desktop Development with C++, .NET Desktop Development, or Mobile Development—you don't need to repair the entire IDE.
Steps
Open Visual Studio Installer.
Select Modify.
Locate the problematic workload.
Uncheck the workload.
Click Modify to uninstall it.
After completion, check the workload again.
Click Modify once more to reinstall it.
Why this works
This "soft repair" reinstalls only the affected workload, including its SDKs, templates, tools, and dependencies.
Benefits include:
Faster than a full repair
Preserves projects and settings
Keeps installed extensions
Reinstalls only damaged components
This approach is ideal when only one development workload is malfunctioning.
Solution 3: Re-enable Disabled Packages Without Resetting Visual Studio ⭐ Most Popular Solution
Some IDE problems occur because Visual Studio has automatically disabled a package or extension after a crash.
Many developers mistakenly run:
devenv /ResetSettings
This command resets your IDE preferences, keyboard shortcuts, fonts, and window layouts.
Instead, use:
devenv /ResetSkipPkgs
Run the command from the Developer Command Prompt for Visual Studio.
After Visual Studio starts successfully, open Visual Studio Installer and perform a Repair if necessary.
Why developers recommend this
devenv /ResetSkipPkgs simply re-enables packages that Visual Studio previously skipped during startup. It does not reset your personal settings, making it a safer first step before using a full repair.
What Repair Does NOT Remove
A Visual Studio Repair will not delete:
✅ Solution files (
.sln)✅ Project files (
.csproj,.vbproj,.vcxproj)✅ Source code
✅ Git repositories
✅ Local NuGet packages in your projects
✅ User documents
✅ Workspace folders
Your code remains exactly where it was before the repair.
Additional Checks
If problems continue after repairing Visual Studio:
Restart Windows after the repair completes.
Update Visual Studio to the latest stable version.
Verify the required .NET SDKs are installed.
Delete the .vs, bin, and obj folders, then rebuild the solution.
Disable recently installed extensions to identify conflicts.
Review the ActivityLog.xml for startup errors.
Ensure Windows is fully updated.
Common Problems Fixed by Repair
| Issue | Usually Fixed by Repair |
|---|---|
| Visual Studio crashes on startup | ✅ |
| IntelliSense not working | ✅ |
| Debugger not hitting breakpoints | ✅ |
| Build tools missing | ✅ |
| MSBuild errors after update | ✅ |
| Missing project templates | ✅ |
| Corrupted IDE components | ✅ |
| Extension loading failures | ✅ |
Conclusion
If Visual Studio becomes unstable, Repair is the safest and most reliable solution. It restores damaged IDE components while preserving your projects, source code, Git repositories, and personal settings. For issues limited to a single workload, reinstalling just that workload is faster than repairing the entire IDE. If startup problems are caused by disabled packages, devenv /ResetSkipPkgs can often restore functionality without resetting your customized environment.
By following these methods, you can repair Visual Studio 2025, 2022, or 2019 confidently without risking your development work.

0 Comments
thanks for your comments!